Stash Busting 101: A Pet Placemat Tutorial

Stash Busting 101: A Pet Placemat Tutorial

If you like sewing and crafting, you should definitely check out Whitney Edwards’ YouTube channel, Whitney Sews.  Her tutorials run the gamut. You can find everything from tote bags (lined and unlined!) to costumes to zippered pouches to baby and toddler wear to quilts (and much more!). There is a family feel to her channel, which is heightened when her mom and children make guest appearances! (We’ve also been treated to a rare shot of her husband.) That warm feeling filters through to her tutorials in which she gives clear instructions to beginning and advanced sewers.

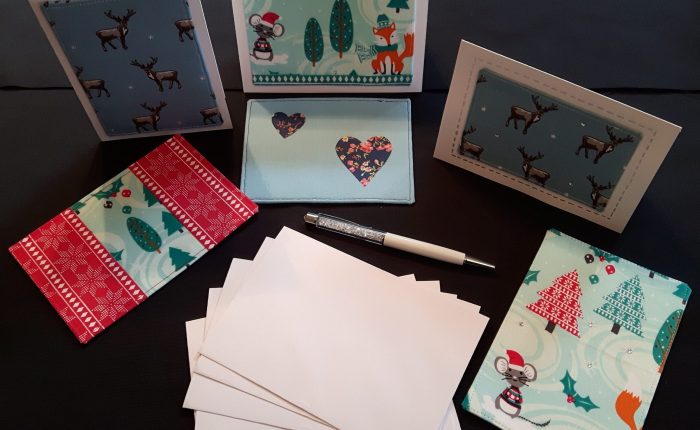
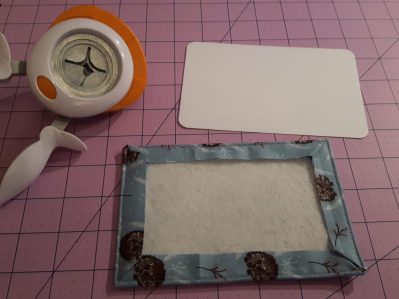
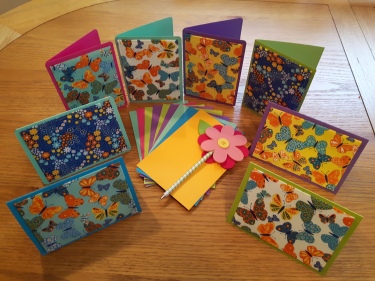
Recognising the enormous stashes of fabrics and notions that sewers accumulate, Whitney recently challenged herself (and us, her subscribers) to sew our stash during 2017 instead of purchasing new bits and bobs.  You’ll find that video here.  For the past week or sew (pun totally intended!), I have enjoyed seeing how people from around the world are meeting the challenge, and I’ve done a few bits as well including making more fabric cards. (Want to make some yourself? You find instructions in my last blog post.)

2017-01-26-09-34-59

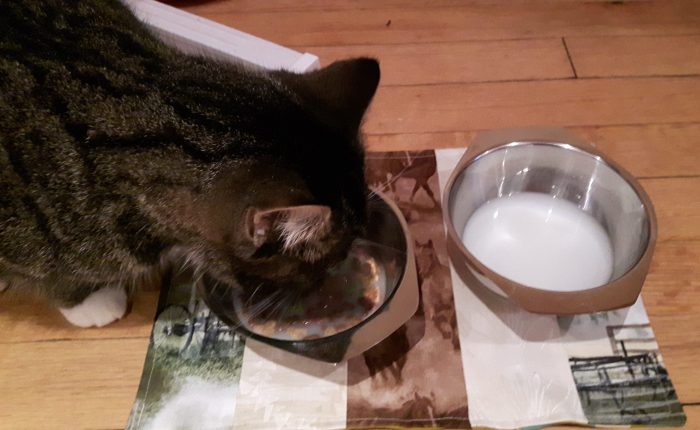
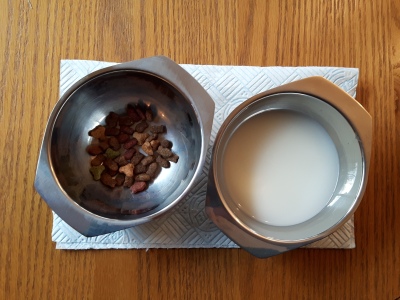
The pet placemat is inspired by this little stinkpot, Lulu, who showed up a few weeks before my brain surgery. (It wouldn’t be one of my blog posts if I didn’t bring it up. What can I say? I cannot believe they guntered around in my noggin and I lived to tell the tale!) She made a great kitty companion during my recovery.

wp-image-1772217499jpg.jpg

After her arrival, we gave Lulu two of our good stainless steel bowls, and set them on a folded piece of paper towel. Trés chic!   Needless to say, I had been wanting to gussy up the joint for a while.

2017-01-23-13-43-54


The Crafty Academic’s Pet Placemat Tutorial

I guarantee that you won’t need to buy anything to make this placemat. As a matter of fact, knowing the amount of fabric that sewers collect, you’ll probably be able to make 10 without putting a huge dent in your stash! (Oh drat! That’s the whole point, isn’t it? Maybe you better make 25 and give them away or sell them at a craft fair.)

What you need

    2017-01-23-13-51-39   2017-01-23-14-56-03

* Fabric for the front and back of the placemat.

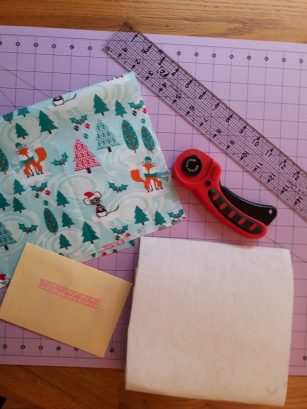
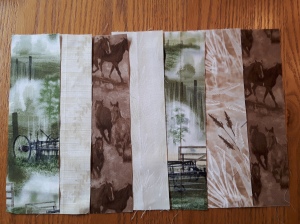
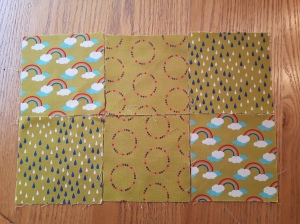
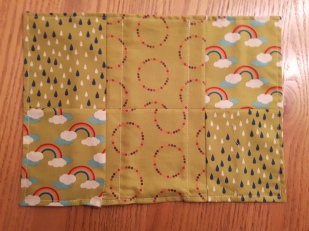
With Whitney’s Sew Your Stash Challenge in mind, I raided my stash and found these fabrics. The country fabrics on the left were left over strips (approximately 3 inches wide) from a quilt top I made for Mr. Crafty Academic who is a farmer. The 5-inch squares on the right were leftovers from a charm pack. The measurements are up to you. I used the paper towel as a guideline, but I knew I wanted to make it a little bigger. My finished placemat is 11.75in x 8.5in (30cm x 21.5cm).  The front doesn’t match the back, but that doesn’t bother me one bit. It’s truly reversible!

* Sewing machine or hand needle

* Thread

* If you want to make a patchwork placemat like mine and your scraps aren’t small enough, you will need a rotary cutter and self-healing mat (or plain, old scissors) to make your own strips and squares.

* Scissors

* Pins

What you do

2017-01-23-17-11-44

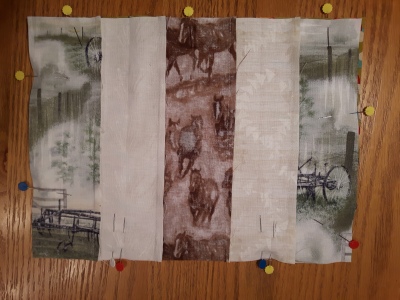
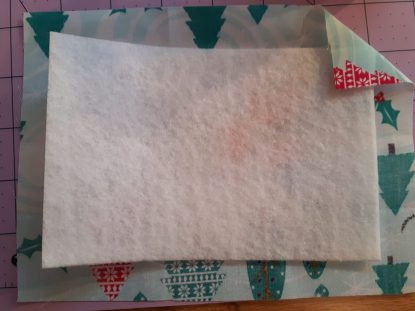
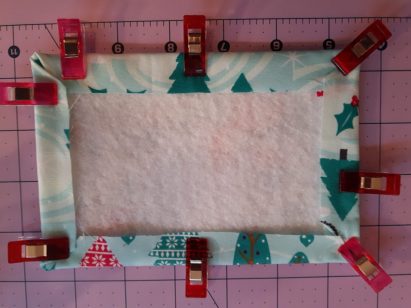
Sew your strips and squares together using a 1/4in (1/2cm) seam allowance.  (Notice that I used only five of the seven original strips. I did that so that the width of the placemat was closer in size to that of the squares after I had sewn them together.)  Place the pretty sides of the fabric together and pin around the edges. Using a 1/4in (1/2cm) seam allowance, sew around the outside of the placemat. Make sure to leave a gap so you can turn it right side out after you sew. (My gap is marked above by the sets of two pins on the bottom of the placemat.)

2017-01-23-17-58-39

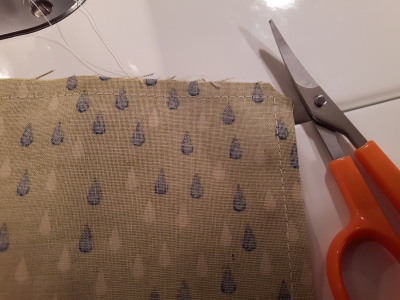
After sewing the front and back together, clip the corners (but don’t clip your seam line!) to reduce bulk, which helps make the corners sharp and crisp after you turn it right side out.

2017-01-23-18-19-18

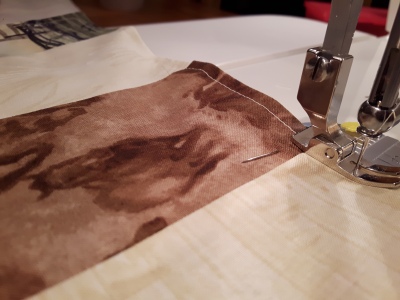
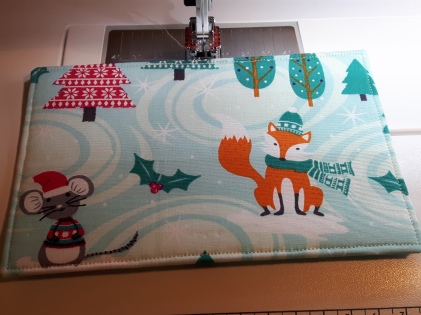
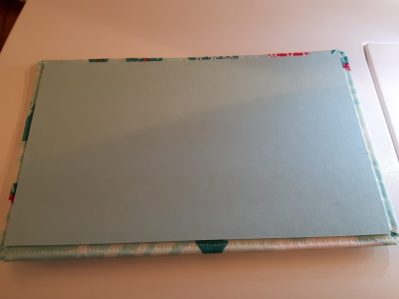
Once you have the placemat turned right sides out, give it a press and topstitch around the perimeter about 1/4in (1/2cm) to give it a finished look.  (I also ran two lines of stitching on the left and right of the middle strip (with the horses on it) to secure the pieces together. You can see them best on the back of the placemat, which is shown in the right-hand photo below.)

 Voilà!! You’re done!

2017-01-23-18-28-57   2017-01-23-18-29-27

If you make your own pet placemat, please share your work with me using the social media links on this page, and let me know if you have a specific project that you’d like me to do a tutorial on in the future.

2017-01-24-16-57-32

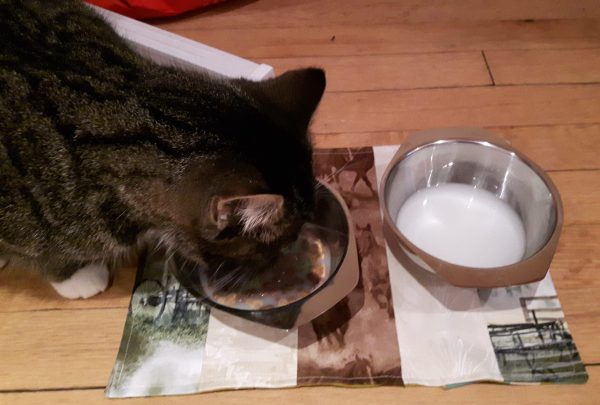
The placemat in action. It’s Lulu-approved!

Bedazzled Paperclips, Travelling Mail, and a Fabric Postcard Tutorial

Bedazzled Paperclips, Travelling Mail, and a Fabric Postcard Tutorial

Since my diagnosis with a brain tumour in May 2016, I have inexplicably rediscovered my love for all things stationery: stickers, journals, cards, office supplies, planners, etc.  Before I knew it, I bought a hot glue gun and bedazzled a ginormous number of paper clips!

Bedazzled Paper Clips
It’s art, isn’t it?  I call it “Glue Gun Frenzy: A Study of Bedazzled Paperclips” (2016). Pretty sure the National Museum will ring to add this masterpiece to their collection!

In late August, shortly after my (very successful) brain surgery that eradicated Tommy Tumour completely, I watched Daisy Martin’s video about a group she set up on Facebook called Travelling Mail.  Martin is a multi-faceted YouTuber (see her blog My Green Cow for more information on planning, smashbooking, and her other artistic ventures). I had enjoyed her creative journaling and unboxing videos for a few months prior to surgery, and I was thrilled to find out about the opportunity to participate in Travelling Mail.

What is Travelling Mail?

The premise of Travelling Mail is simple, fun, and well-suited to those of us who love snail mail.  (You remember that, don’t you? An actual human being brings letters and parcels to your house! Wowzers!!) You prepare a postcard and post a message on the Travelling Mail Facebook page. The first person to respond then private messages their address to you, and you send that person the postcard to sign and send on to another person in the group. When the postcard is full, the last person to sign sends it back to you, its “owner”.  You now have a great memento of its journey around the world. You can also prepare and send travelling notebooks. There is a little extra work involved with receiving notebooks. Before sending them off, you fill out four pages of it with anything from information about yourself and your life to doodles to recipes to favourite quotes. For me, the postcards have been more suitable to my recovery, and I’ve received mail from people in locations as diverse as Sweden, India, Wales, Turkey, America, Ireland, France, Australia, England, and the Philippines. I’ve started a few postcards and notebooks too, including a few I handcrafted like this fabric postcard.

Back and front of first fabric postcard
Woodland Wonderland: A Fabtic Postcard” (2016)

The design was inspired by the contents of the October 2016 Brimbles Box, a monthly stationery subscription featuring the work of mixed media artist, and self-described “planner nerd, stationery addict, art journaler, bookworm, and tea lover!”, Anna Brim (visit her blog here). Her whimsical art makes you feel happy and smiley, and that month’s box had an autumnal theme that featured woodland animals. (You can see an example of her artwork to the right of my name.  It’s a sticker version of her adorable woodland fox!) I immediately grabbed this square of fabric from my stash, added two borders to it, made it into a fabric postcard, and sent it on its way to travel the world!  After three weeks and two days, The Crafty Academic was back in the sewing saddle, and it felt great. (I did have to lay down after only 45 minutes—What can I say? They had cracked my head open like a walnut!) Llinos, one of the members of the Travelling Mail group, asked me how I made the postcard so I’ve created the following tutorial to inspire you to make your own! 

 The Crafty Academic’s Fabric Postcards

Although I’m calling these “postcards”, they are actually one-sided notecards. If you are using them for Travelling Mail, they need to be free of any address and postage to make sure there is plenty of room for people to sign them!  And, they are just too stinkin’ pretty to try putting through the post!

What you need

A Selection of the Materials You Will Need
A selection of the materials you will need to complete this project

All measurements below are based on the size of a C6 envelope, which measures 6.5in x 4.5in (16.5cm x 11.5cm).  Feel free to decrease or increase measurements depending on envelope size.

* Fabric (7.5in x 5.5in / 19cm x 14cm)

* Medium to heavyweight interfacing (6in x 4in / 10cm x 15cm)

* Sewing machine

* Rotary cutter, or scissors

* Self-healing cutting mat (if using rotary cutter)

* Ruler

* Wonder clips or binder clips (or anything else you have in your stash to hold the layers together)

* Cardstock or scrapbook paper (5.75in x 3.75in / 14cm x 9.5cm)

* Corner rounder (optional)

* Glue (I used UHU, but any kind of craft or fabric glue will work, and regular school glue could be used in a pinch)

* Envelope (Size C6: 6.5in x 4.5in / 16.5cm x 11.5cm)

* Embellishments such as rhinestones (optional)

NOTE: I found that light interfacing resulted in less precise mitred corners, but use what you have in your stash and see how it works before you rush out to buy something.

What you do

2016-10-27-15-51-11

Place the fabric pretty side down on your work surface and set the interfacing on top. Centre the interfacing on the fabric.  Fold each corner of the fabric back (as shown above), forming a 45-degree angle, and clip in place.  Once you finish all four corners, fold each side of the fabric to the back of the card, clipping securing as you go.  When you finish, you should have something that looks like this:

2016-10-27-15-55-06
Don’t have Wonder clips like those above? No worries! Use standard office binder clips.

Ready! Set! Sew!

Take the postcard to your machine and sew a 1/8-inch seam allowance around all edges. Anchor your starting and stopping stitches by backstitching over the first three or four stitches. Or, if your machine has one, use its “Fix” feature, which ties a knot to secure your sewing before the first stitch and after the last. When finished, your card should look something like the one below.

2016-10-27-17-28-26
Ta da! Your (almost) finished postcard!

Take it back to your work surface and apply the cardstock to the back of the postcard using your glue of choice.  Be careful with the amount of glue you use. Using too much results in spots on the front of the card even after the glue has dried (not pretty!).  Guess how I know: personal experience!

2016-10-27-17-29-58
You can leave the corners of the card as is, or you can round them using a corner rounder like the one below. Don’t have a corner rounder? Don’t panic! Use a coin to trace a curve on each corner, and trim with scissors.  It’s just that easy!

2016-10-27-18-12-01

When the glue has dried, your card is finished.  Want to jazz it up a little more?  Add some embellishments like rhinestones (visible in the card on the lower right of the photos below). You can also rework the measurements to make fabric greeting cards like those shown.  Please share your work with me using the social media links on this page.

One last thing. Don’t have access to a sewing machine? Let me know in the comments if you’d like a follow-up “no-sew” tutorial!  And most importantly, have fun!


Recovering from Brain Surgery, or “Gunterin’ Around”

Tomorrow marks 16 weeks since a team of three (yes, *three*!) neurosurgeons and a host of other medical staff fiddled around in my cranium to extract Tommy Tumour. Thanks to that fat bastard, I had lost over 70% of the vision in my left eye.  Other than that, I had no symptoms: no headaches, no seizures, no balance issues.  Long story short, I was misdiagnosed with a specific vision problem in 2013. As late as April 2016, however, I was further misinformed: “If you were older, we’d call this a mini-stroke”.  Mini-stroke, my arse!

Shortly after that consultation, I was sent for an MRI that showed “a suprasellar mass lesion compressing the adjacent pituitary gland and pituitary stalk.  The lesion is also displacing the adjacent Circle of Willis vessels and the optic stalk”.  You may have read my prior post, Top 4 Fears Before Brain Surgery, in which I discussed, among three other fears, my concern about stroking out on the table during the surgery.  Well, that bit you just read about the Circle of Willis was what scared me most as all cerebral blood flows through it. What if the neurosurgeon had a medical problem himself during the operation? What if he accidentally tripped, or had a stroke, and nicked one of those vessels?  That would be it! I’d be kaput!  In the end, though, the surgery went well. We’re not sure exactly how long it took since there was a delay; but my husband James and I said goodbye about 1pm, and I was returned to the neurosurgical unit about 7.40pm, looking like death warmed over with a big bandage on my head and a little blood dribbled on the sheet for good measure.

James’s top fear was that the surgery would damage my brain, leaving me without my memory.  When the neurosurgeon came to talk to him afterwards, James asked when he would know if I was compos mentis.  The surgeon replied, “Give her a minute. The effect of the anaesthesia is the equivalent of drinking an entire bottle of whiskey”.  Let me tell you something. After I heard that, I realised how I felt the day after the surgery—exactly like I had a hangover!  In truth, it was the worst hangover in the history of hangovers.  I could barely move, I could barely talk, I had a vicious headache, and I was sick to my stomach—all day long.  As the Irish comedian Brendan Grace would say, “It wasn’t a hangover; it was a hangaround”. That pretty much sums up post-op, Day 1. The only good thing about that day was realising that I could see again out of my left eye.

Post-op Day 2 was better and worse.  The shunt draining my wound was removed. Not only did it feel like my brain was being sucked out through a microscopic tube, they surely took 8 feet of tubing out.  Shortly afterward, they removed my catheter; and later that day, I had an MRI and took my first steps. I was in serious pain all day long.  James says that he was in a bolshiness-free zone for all of 36 hours (bolshie meaning “defiant and uncooperative” per Merriam-Webster) and that ended abruptly after I returned from the MRI.  Let’s set the scene for this next bit.


The Cast: 

The Crafty Academic (CA), the patient

Mr. Super Hon Bun (SHB), the husband

Mick, the taxi man


The Setting: The neurosurgical ward in Dublin’s Beaumont Hospital, and the area around the hospital


The Scene:  Second day after craniotomy to remove Tommy Tumour (AKA The Fat Bastard).  CA has just returned from having an MRI.

SHB (looks up from his book, The Lost History of 1914): You should try to sit up in the bed.

CA: I’ll sit up when they tell me I have to sit up, and not until then!

SHB: Fine. Grand job. (returns to reading his book, thinking to himself that his wife is better now since she is “giving out” to him)


Later that day, an urge came over me.  I had survived the first day by eating virtually nothing. Now, on Post-op Day 2 and nearly 48 hours without food, I had a hankering.  It was a strong one—the unrelenting need for a vanilla milkshake and not my favourite—chocolate.  A vanilla milkshake was the only food that didn’t make me feel sick to my stomach just thinking about it.


CA (who hates asking for help): Hon, I’d really like a milkshake. Can you get me one?

SHB: Yes, I’ll get one. Just as soon as I figure out where. (Some time passes as SHB thinks to himself that this will require major logistics. Where will he get the milkshake since there is no actual restaurant in the hospital?  How will he get there? Will it involve the infamous Dublin taxi man? CA notices there is a lot of fiddling of the phone going on and a general lack of progress with the milkshake.)

CA (in a bolshie tone): Hon, I really need that milkshake.

SHB: Right. I’m going for it now.

 SHB makes his way out of the ward and downstairs to the hospital exit, procuring a taxi at the nearest taxi rank.  Mick, the driver, turns out to be a definitive example of a Dublin taxi man. The following exchange occurs on their way to get the milkshake.

MICK: What can we do for you today?

SHB: My wife had brain surgery, and she needs a milkshake. Where would we get one?

MICK: The nearest place is KFC.

SHB: Right, then. KFC it is.

MICK: Didja tell me your wife had brain surgery?

SHB: She did. Tuesday.

MICK: And how is she?

SHB: All things considered, she’s not too bad. And, especially, when you think of what they had to do.

MICK: Well, now. This is the thing, they’re not fuckin’ meant to be in there! That’s what the skull is there for—to keep ‘em out! So they have to cut a hole in it, and then they go gunterin’ around in there!

 Mick and SHB proceed to set the world to rights, procuring the milkshake along the way.


Let me tell you something: that was the best fucking milkshake I’ve ever had. It was creamy, cold, and delicious. Just what I needed while I recovered from them “gunterin’ around” in my brain!


Waiting for Brain Surgery: Sam Beckett, Godot, and Druid Theatre

When I started this blog last month, I never dreamed I would find a way to bring together my work as a theatre academic with my experience as a brain tumour patient. But, the time has finally arrived (no pun intended, actually).

I work for the Galway International Arts Festival for a few weeks each year and part of my job involves seeing almost everything on offer.  This year was a fantastic production of Samuel Beckett’s Waiting for Godot by the company that was the focus of my PhD thesis: Galway’s Druid Theatre. Quite frankly, it’s the best production of the play I’ve ever seen.

Now, I don’t love Beckett’s work. I’ve taught it for years and I certainly appreciate it, but I don’t love it. (Am sure this is a horrifying admission for my academic friends and colleagues but I remain unapologetic.) The thing is, though, I respect Beckett’s work. For me, his seemingly impenetrable writing started to make sense after I found out two things about him as a person: (1) in his younger years, he was viciously attacked and nearly died and (2) he was part of the French Resistance during World War II. Academia isn’t a big believer in analysing artists’ works in relation to their biographies as it is seen as reductive. For me, however, it makes sense that Beckett’s surreal plays and prose are, in part, surreal because of those experiences. Previously, I understood this in terms of WWII and the atrocities of the Holocaust. How could something like that actually happen? Now I understand it in terms of a serious health condition. How could like this actually happen to me? This is some crazy stuff. And if I write a play later in life, I can pretty much guarantee it will, in some way, reflect my experience as a (I hope!) brain tumour survivor.

Waiting for Godot is, arguably, Beckett’s most well-known play. Famously, one critic of its premiere in the 1950s stated that it’s a play in which nothing happens…twice (!). Basically, the play tells the story of Estragon and Vladimir as they wait for Godot to arrive, ’nuff said.  Under Garry Hynes’s skillful direction, Marty Rea and Aaron Monaghan as the two tramps bring alive their mundane conversations through banter and great physical comedy. Think slapstick, think Charlie Chaplin meets the Keystone Cops, and that gives you a flavour of the hilarity that abounds in this production.

The waiting, though, that’s the important thing as is what happens when we wait: how we wait, what we talk about, what we don’t talk about, what we do, what we don’t do. Rea and Monaghan did a wonderful job bringing out the sibling-like relationship between their characters, which, in some ways, mirrors the banter between a married couple.  Like Gogo and Didi, my husband and I have had a few pratfalls, a few soft looks, a few moments of anger and a few of sadness. But, we’ve done it together just like Gogo and Didi. And so, like them, we wait…for brain surgery.


Top 4 Fears Before Brain Surgery

I received a call from the neurosurgeon last week saying he had scheduled my surgery for Tuesday, 23 August, *if* a bed was available in the hospital. The confirming call came around noon today, and now I am ensconced in Dublin’s Beaumont Hospital with my own pillows and the cases I made for them. (They’ve been a hit with the staff, BTW!)

I’ve met a number of staff members who have all been great and even laugh at many of my jokes. (Now, if I can get the head honcho neurosurgeon to crack a smile at some point, I’ll be delighted!) One of the people who came around was a surgeon from my team who told me all the awful things that could happen to me during or after the surgery. Protocol, you know. I wasn’t much phased because I had already thought of the worst. (My husband is the positive thinker in this relationship.)

So here they are: the top four fears the night before you get your head cracked open like a walnut. (Note, though, that these are *my* top fears. Yours may be different, and that’s OK.)

(1) Stroking out on the table. I’m afraid I might die, or I will become totally dependent on others. The first is kind of a moot point. If I die, I won’t know it so what the hell do I care?  Except, of course, I do care, particularly about those I would leave behind. The second is the actual fear. In the words of my husband, “Christ, woman, it’s hard to do anything for you!” My mom and dad both died when I was 21, and I’m an only child so “self-sufficiency” is my middle name. I hate the thought that my husband might have to do everything for me. It’s not a life I want for him, and I certainly don’t want that for myself either.

(2) Tommy Tumour is malignant.

Tommy is presenting as either a meningioma or a non-secreting pituitary macroadenoma. In itself, this is pretty good news because, generally, they are benign tumours. The truth is, though, no one will know exactly what it is until the pathologists slice it, dice it, freeze it, stain it, and look at it under the scope. For a negative thinker, I’m doing pretty well on this score. I can’t even go there, but it’s still a nagging worry. (If you’re wondering why I’m calling the tumour Tommy, here’s why: he’s like a bad boyfriend you can only get rid by using extreme measures. The fat bastard.)

(3) Throwing up. I hate throwing up. It grosses me out. Actually, I just gave myself the gags writing those sentences. I can’t think of anything worse than throwing up *while having stitches in my head*. Lord have mercy and save my soul!  Some good news from Dr. Ciaran the ward doctor who took my history and my blood: there is incredible anti-nausea medication and all I have to do is ask for it! Awesome!!

(4) “Mah hair!”. Do you remember the scene in Saturday Night Fever when someone smacks John Travolta on the head after he’s spent a lot of time primping for his night on the town? He says, incredulously,  something like, “Mah hair! He hit Mah hair!”. In this process, I have discovered that there are three things I am vain about, three things that I don’t want to lose: my teeth, my bosoms (They might be saggy, but they’re mine!), and “mah hair”! I’m going to request a line of shaving rather than a patch, but….it will never be the same. There will always be a scar to mark this event in my life, a physical reminder that the Christmas nutcracker came early in 2016.

I leave you now, on the eve of this momentous occasion with this:


The Only Tip You Need to Prepare for Brain Surgery

A few weeks ago, my husband and I each awoke in the night feeling sick to our stomachs.  It wasn’t something we ate; we were stressed out…to the max! You see, in late May 2016, I was diagnosed with a brain tumour.  That night a few weeks later, the reality of the situation hit us like two Mack trucks steaming across the Rocky Mountains.  Before we went to sleep, we had talked about the surgery, my recovery, and the various bits and bobs we had read that told us what to expect once we came home from the hospital: a weeping incision, terrible pain, hair matted with blood and dried surgical jelly.  “I’m scared, hon”, I said, my voice quavering.  “I’m glad to hear you say that”, my husband whispered, “because I’m terrified”.

The title of this blog is The Crafty Academic: before starting my craft business, I completed a PhD in Irish Theatre and taught at the university level. As a researcher, I continue to seek answers: from my neurosurgeon, from service organisations (like Brain Tumour Ireland or the American Brain Tumour Association), from bloggers who have had brain surgery, from caregivers of those who have had brain surgery, from friends who are doctors, and the list goes on and on and on and on and on.  In July, our fears were put a bit at ease.  We had a lovely visit with Anne Buckley of Irish Brain Tumour Support, which has three locations across the Republic of Ireland: Cork, Dublin, and Galway. We met at Cancer Care West’s lovely space in Galway. As a result of such meetings and my research, I have gathered much information, but relatively few answers.

So here it is, the only tip you need to prepare for brain surgery: “You won’t know how it will go until after you’ve gone through it”.  Every tumour, like every patient, is different. Some of us are older, some of us are younger. Some of us heal quickly, some of us heal more slowly.  Some of us have a high pain threshold, some of us have a low one.  Some of us will hear clicking, clacking, and bubbly sounds in our heads as things settle down, some of us won’t.  There is no way to predict exactly how you will react to any of it.  (This, of course, is terrible news if you’re like me: a control freak who wants to figure out ways to relieve stress before it starts!)

I haven’t had surgery since I had my tonsils and adenoids removed when I was 6 or 7.  At that time, I thought I was going to camp! I had a great time and hallucinated that the night-duty nurse was my grandmother. In my present situation, I’ll keep you posted over the course of the next few months as I wander through this new, uncharted territory.  If you are in a similar situation as me (that is, waiting for brain surgery), just remember: there is no way our experiences will mirror each other.  We can only do our best.